


The TR-1's wireless flash trigger provides flexibility in accessing studio photography. ... Read More
The TR-1 wireless flash trigger offers versatility when working in a video lab.
The irritating sync cable isn't troubling any more.
An infrared transmitter functions the same as a television remote, but the TR-1 has a more powerful signal.
The signal is transmitted 360 °.
The TR-I is a cost-effective, wireless flashing solution.
The Falcon Eyes TR-1 operates with all cameras which are fitted with a center contact hotshoe where the external flash unit is usually installed.
Works with a built-in slave on Studio flash units.
Eliminates annoying sync cables.
The infrared transmitter works as a remote control for TV.
Specifications:
- Working distance: up to +/- 25 m
- Signal: infrared
- Connection: by cable or via the system flash socket
- Power supply: 2 x AA batteries (not included)
- Note: The Falcon Eyes HS-25SA must be used for use with Sony and Minolta cameras
Instruction Manual Falcon Eyes TR-1 infrared flash trigger
Professional FLASH REMOTE-CONTROLLED TRANSMITTER
A. Nomenclature
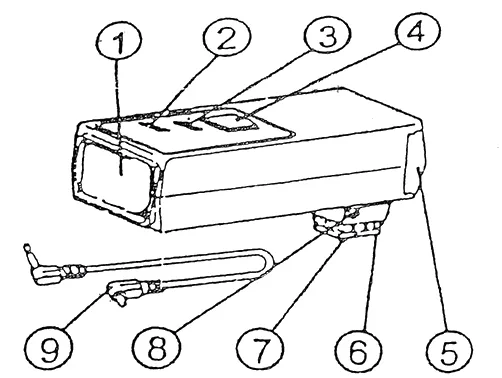
- Transmitting Window
- READY Lamp
- Power Switch
- Test Transmitting Button
- Battery Compartment Cover
- Shoe
- Hot Shoe Contact
- Ø2.5 Cable Connecting Socket
- Strobe Connecting Cable
B. Battery Loading
- Open the Battery Compartment Cover (5) and load two AA size batteries (optional) in the comparünent in a correct position of the electrodes.
Set the power Switch (3) at "ON" position.
The READY lamp (2) turns on in orange.
When the Test Transmitting Button (4) is pressed. Theorange READY Lamp (2) blinks for an instant and a correct transmission Of the infrared signal from the transnlitter can be confirmed battery power crn be *But off automatically in about 3 Minutes after the shutter pressing.
C. Connecting Method
- In case of the camera with a hot shoe:
- Insert the shoe (?) of the transmitter into the hot shoe of the camera and fix it with a lock screw.
- Set the Power Switch (3) at " ON" position and check if the READY lamp (2) blinks in orange.
- When the shutter of the camera is released, the READY lamp blinks for an instant and a correct of the infrared signal from the transmitter can be confirmed.
- In case of the camera with an X contact:
- Connect the +2.5mm plug of the supplied Strobe Connecting Cable (9) with the Cable Connecting Socket (6).
- Connect the plug for X contact of the Strobe Connecting Cable (9) with the X contact of the camera.
- When the shutter of the camera is pressed, the READY Lamp (2) blinks for an instant and a correct transmission of the infrared signal from the transmitter can be confirmed.
D. How To use the transmitter and the Notes
- Whenever the shutter is released, an infrared signal is transmitterd from the Transmitting Window (1) of the transmitter which is mounted.on the camera. The slave unit receives the saic signal and activates the connected flash unit to make a flash synchronization for an instant.
- In case of using this outdoors, if an obstacle is standing between the Transmitting Window (1) and the stave unit, the transmitter may sometimes do mot function in order.
Please use it in the opposite position of the Transmitted Window (1) and the stave unit. - When this transmitter is used at a studio, the transmitted infrared signal reaches the slave unit reflecting on the ceiling or the wall and it is not necessary to set the Transmitting Window (1) and the slave unit in the opposite position.
- In case this transmitter is not used for a long tine. Remove the batteries from it.